Showing posts with label Bombards and Bayonets. Show all posts

Wednesday, 8 November 2017

Jacobite Rebellion, Prestonpans - Battle Report

Howdy everyone,

Around mid-October I had the chance to get together with the usual suspects and try out a new battleground of sorts, for me at least.  My buddy Ed has recently been doing a bunch of work and painting around the Jacobite Rebellion and some of the history and battles of that conflict.

As always, the research and extra work that Ed puts into his projects shines through...the numbers of well painted figures that he brings to bear combined with some top notch scratch built terrain combined with extensive historical research always with a much higher appreciation of the era and battlespace that I'm bleeding 1's over.

The Battle of Prestonpans
By Hoodinski - Own work, [1], CC BY-SA 3.0, https://commons.wikimedia.org/w/index.php?curid=15433911

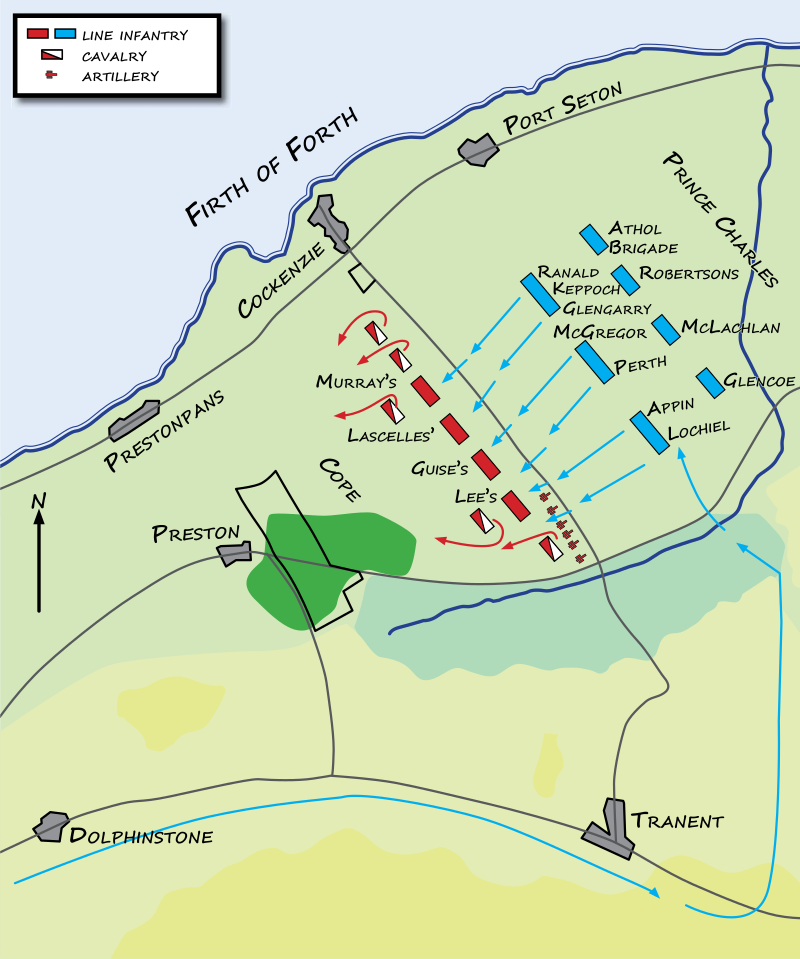
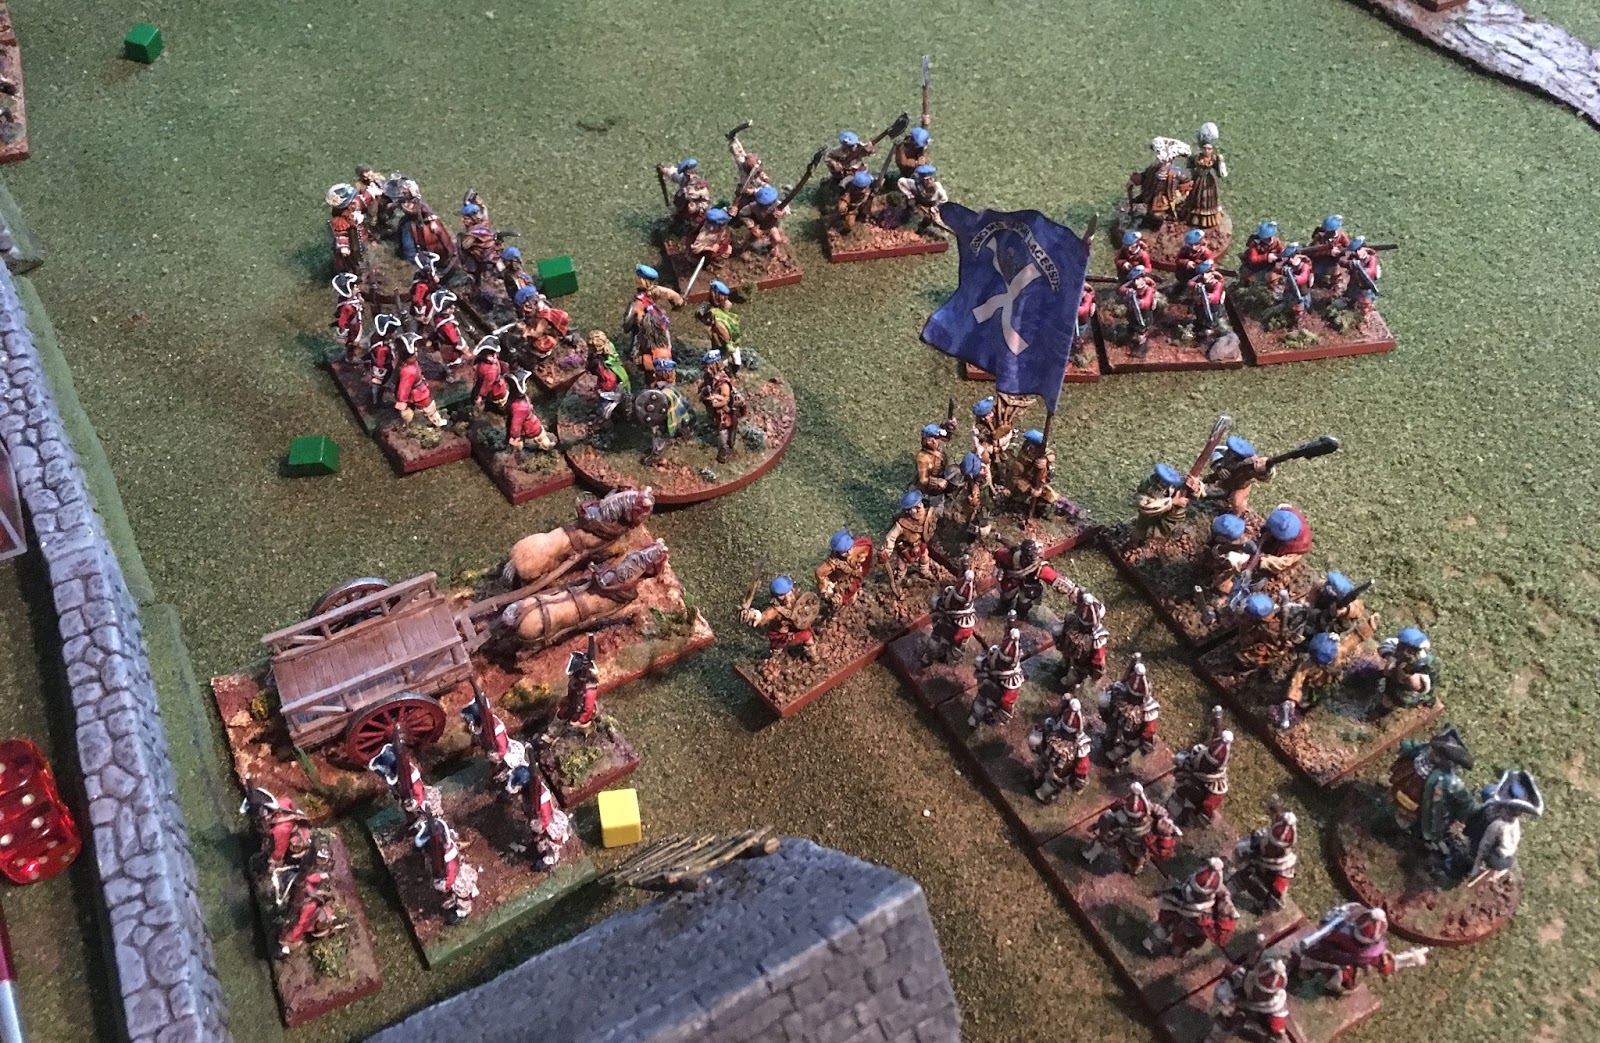
From the British end of the table, the picture below is Ed's vision of the battlespace...
You can see the town in the centre on the Brit's table edge, a main road running left to right with a branch moving towards the Scottish edge of the table.  There is a French force of 'observers' and 'advisors' overlooking the battle...one of the event cards in Ed's scenario allowed for a French intervention into the battle.


The strong British centre composed of experienced Grenadiers.
 
The British right flank, anchored by the guns of the Royal Artillery...able to fire ball or canister...the canister proved fairly effective in reducing pressure on the right, the ball proved annoying but not overly effective.
 
The local militia troops, not overly high quality but willing to march forth for the King...of England.

The overall battle was fought at two different paces...on the British left, the Scottish horde pushed forward, charging hard to get into hand-to-hand contact.  The British had the advantage in long range, but the Scots excelled at close combat...axes, swords, and Scottish pluck would soon put a lot of pressure to bear on the British left.
 
Conversely, the British right was quite orderly...the British took the time to establish themselves in a proper firing line, while the Scottish similarly took care to advance in column of route and then break into advance order once they were closer to the Brits.
 
On the British left, the situation quickly took a rather dire tone...the Scots were doing an excellent job of getting in close and putting hard steel to British skulls...various formations were taking having morale reductions and taking casualties.
 
On the right, the artillery struck first blood and put some serious hurt on the Scottish front rank reducing their numbers nicely...the canister rounds proved very effective and caused some morale disruptions...I think this was a high water mark for the British contingent... 
 
fighting from the left flank is starting to interfere with the right rank actions...die rolls are not going well, the militia and main regiment on the right are suffering serious morale issues from casualties...
 
in the distance, the French intervention card comes up...they begin a very slow advance towards the battlefield.  Because the troops are in close combat and arcs of fire are getting tight, the Royal Artillery cannot put any more canister fire into the Scots...they adjust fire, switch to ball due to range, and try to get some long range tags onto the French...
 
The right flank is having some serious difficulties...the strong Grenadier centre stands tall...
 
and after some very bitter fighting...is greatly reduced in strength...for most of the game, the Scots had a very good grip on the British left and made consistent, steady progress on the right flank...although the French intervened, they had little influence on the overall battle. 
 
The main strengths of the Scots definitely laid with their close combat ability and clan/warband structure that allowed for more leadership at lower levels proved critical and allowed for more movement on the battlefield.  Funny enough, the greatest achievement for the British came through a chance event when it was revealed that the Colonel...who was ill and billeted in another town away from the fighting...turned out to be 'okay'...it had the effect of ensuring that the Scottish cavalry could not intervene on the left flank...every time a British soldier fell, a skull was crushed, another regiment was routed...it was all okay, cause thank God the Colonel was okay...
 
the glorious dead...Scottish and British casualties...although I must admit I think those were mostly British troops... 

Sunday, 28 May 2017

Cangames 2017 - Bombards and Bayonets

Good day folks,

Another installment of my Cangames experience last weekend.  I was commenting earlier on the great looking tables at the con this year and nothing will show this better than the Bombard and Bayonets game that I had the opportunity to play in this year.  THE TABLE WAS F'ING OUTSTANDING!!!

Made by the same hand as last years Fort Beausejour (scroll down to midpost) and Fortress Louisburg (again, scroll down to midpost) from 2 years ago, my buddy Ed this time constructed Fort William Henry for our besieged entertainment.  Again, another outstanding model and table put together for the game. 

I'll let the pictures do the bulk of the talking...

Please enjoy the pics below...

Overview of the battlefield from the French lines...fort in the distance, trenchworks at the right, river on the left...

The French trenchworks facing the fort and gunline waiting to bring doom...

The French mainguns and their view over the battlefield...battered woods between them and the fort...

Overhead shot of Fort William Henry, looking towards the French lines...not suitable for sustaining a French barrage, the gun ports, pits, and citadel like structure made it a very good anti-infantry structure...

another view towards the French lines...

French allied forces prepared to go in by canoe if they have to...

another view of the French lines looking across their line with the fort to the left of the pic...

river view of the fort and battlefield...I couldn't get enough pictures of the table...very impressed.

Ever the striver of historical accuracy...Ed left a diagram of the fort to compare against his model...looks pretty convincing to me...

The British man their positions...guns up front facing the French

The French engineers confer over tea and tables...I'm sure they're discussing the latest Parisian fashions and geometry... 

The French regiments march into position masked by the treeline from the British defenders

The Regiment takes to the trenchline...

The British man the ramparts on their left

The French engineers...engineer another section of trenchline and move the tabletalk to trapezoids and angles...

The French artillery puts some hurt to the fort...

The diggers continue ignorant of the cracks of artillery or sight of smoke and fires in the fort...

This was just a really cool shot of the battlefield...

The French engineers scream, "creuse les bâtards"...a second line of trench is dug and the earthworks are in place for the much anticipated French heavy mortars...putting the Bombards into...well you know...

The damned British!! Easily their best roll of the game...they destroyed the mortar emplacements before any damage could be rained down upon the fort...I guess this means we're in an infantry heavy fight...

The engineers, unphased, dig another length of trench...the French artillery succeeds in breaching the front of the fort...unfortunately only one section is breached...

The Regiment moves up...infanteers in the lead, grenadiers in the follow...

looking towards the fort...

The Regiment charges...the first company of infanteers is blunted by the fire of the defenders...this opens up the space for the grenadiers (the elite of the Regiment) to take the fight into the fort

The British defend heartily, costing many French heroes...

The Native/Indigenous allies tried to intercept messengers on their way to Albany...the British secured the maximum number of reinforcements...this would prove costly and definitely tipped the balance.  Getting restless, the allies push a water assault on the fort flank...

The Regiment makes it into the fort, pushing hard past the casualties...French artillery continues to fire on the interior of the fort destroying an infantry blockhouse that was full of Rangers...

The Regiment command is taken prisoner, my Regiment has assaulted and laid the groundwork for further French victory...aka died gloriously to the last man...

Substantial damage was done to the fort...the front was breached, the gunline was destroyed, many defenders were killed...BUT the fort held...the bulk of the French combat power was spent...the lose of the mortars and the arrival of British reinforcements was impossible to overcome.
 
A well fought game, a great looking table...much fun was had.