Monday 29 February 2016

The Laws a Coming...Battle Report: Dead Man's Hand

Howdy partners,

A somewhat belated battle report from a Dead Man's Hand afternoon that I had over at Mikes a couple of weekends ago...Mike got the drop on me with his battle report.  We had 3 gangs that day, Mike had his Outlaws (although, they didn't ride into town until game 3), Duncan had some Pinkertons (a new gang to the DMH frontier), and I had my Bandits.

The linked scenario was 3 games...first game, the Bandits try to ambush a couple of Pinkertons as they enter town, second game, the bandits try to knock over the local bank, and game 3, the Pinkertons try to hold back a combined Outlaw/Bandit onslaught as they are outnumbered roughly 2:1.

As before, DMH plays fairly fast, we went through 3 games in about 3-4 hours...the 'scenes' set-up easily for a pretty fun game.  I got a few shots of game 1...totally forgot about game 2...and got a few more for game 3...

Enjoy.

Game 1
The Pinkertons arrive in town, scoping out the lay of the land as they exit the stagecoach near the Saloon...
A couple of Bandits don't really like the law coming into town, so they set to ambush them...

Bandito Jose takes a long look down main street with his repeater ready to back-up the Drifter...
The Drifter runs into close contact...point blank range...lets loose a couple of shots...Pinkerton down. 
The other Pinkertons put bullets downrange at the Drifter...he falls in a hail of buckshot and bullets.
Game 1 is over...
Game 2
This game, the Bandits try to make it out of Dodge with 3 sacks of cash from the local bank...this was very promising in the beginning as 2 of the Bandits were within 1 turn of the tables edge, but were put down by a Pinkerton with a looking glass, long barrel, and a steady hand...game 2 went to the Pinks.
 
Game 3
   
Making to settle a score, the Bandits telegraph some help...the Outlaws arrive into town fresh from the train...they aim to misbehave. 
Being clean cut and handy...the Pinkertons decide to mill about the local Hardware store instead of the Saloon...they end up using this building as their Alamo...the siege is about to begin... 
More Bandits...ready for a fight, looking for trouble...they come into town to the right of the Pinks...Outlaws to their left...its gonna get hairy.
By the time of these pictures a whole bunch of action has taken place...the Outlaws quickly move in from the train station, they use the Stagecoach as a staging point and cover...the Bandits zigzag their way to the solid wall of the store...a couple of them head over to the water tower behind the store and gun down a Pinkerton sniper...short work and payback for the bank heist.  Shotgun Zeke, looking very classy with his top hat, jumps out of cover of the wall, tries to shoot both barrels and is felled by the Pinks...Bandito Pancho, looking smart in his Green mariachi attire puts a bunch of rounds into the store window and door. 
The Outlaws continue to press on the left of the store...the Bandits let the Outlaws bleed a little, but also set up in cover.
Pancho runs closer to the store, lets loose some rounds, takes a couple of hits...Navajo Joe, springs from cover and puts some pressure on...Confederate Boss Jeb runs up to the window and puts a full stream into the store at point blank... 
 
Tight quarters for the defenders... 
Overhead shot...get it...'shot'...punny, no? You can see the disposition of the Pinkertons inside the store, Outlaws on the left, Bandits on the right...
More Bandits come in from the water tower, covering the Pinks on three sides now...being bold, the Pinkertons move out and engage the Bandits from the smaller backroom...with success
This is the overhead of Confederate Boss Jeb...strutting into the store after taking out the last Pinkerton...you know what this means?!?
 
SHOWDOWN...BANDITS...OUTLAWS...HIGH NOON...MAINSTREET 
Bandits win...Mike drew a Joker...zero card...Jeb draws an 8...8 points of damage on the Outlaw Boss...game 3 goes to the Bandits.

Wednesday 17 February 2016

A little Vietnam...and a bit of an experiment

Howdy folks,

If you've been following, you'll probably notice a lot of attention lately on the Cold War...not only has Battlefront gotten into this era, but Ambush Alley Games put out their Cold War Gone Hot book a little while back.  The best part about this is the TY (Team Yankee: Cold War ala Battlefront) plays fast and quick at the Combat Team level...and FoF (Force on Force: Cold War Gone Hot ala Ambush Alley) plays a more defined scenario and force structure at the platoon-ish level...

The best part is that I know have two great rulesets that can play the same figs...outstanding!!

With this line of thought and the reality that Battlefront is having some supply chain issues, I was looking forward to fielding some Anti-Aircraft units but they are not yet available...I'm not pissing and moaning, I actually don't mind the limited release, saves the pocket a little, lets me paint what I have...and possibly allows for a much stronger Canuck dollar (aka might cost a little less).

Anyhow, I looked at the SA-13 and it's vehicle and my research indicated that the vehicle was heavily inspired by the PT-76 amphibious tank chassis.  Soooo, I thought, hey I could get 2 birds, 1 stone if I paint up some of my NVA 76's and then jury rig an air defence mast...so here are two 76's finished, followed up by an initial shot of 2 AA SAM masts built out of plasti-card and BF bits.

If nothing else, I'll be able to have the SAM platforms fit in real well as an improvised weapons platform for my Tomorrows War environment.

Cheers.

2 x PT-76 Amphib Tanks for the North Vietnamese Army...these actually painted up quite nicely only taking me a couple of hours from base to final inks and decals...pretty quick for me.

Only 3 more to paint for the platoon/company and I have enough for my VC/PAVN troops as well as enough to put towards a Long Vei scenario.

Improvised Air Defence...
Basically, 2 plasticard bases that sit on 2 Canadian pennies...the pennies fit the turret holes very well so the mast won't slip around.  I filed the edge so that I didn't scratch up the paint work, clipped the edges to give a BSG pseudo sci-fi look...and it fit better that way. 
I then took a couple of external T-34 tanks, a couple of plastic bits from one of BF's boxes for the front of the platform...plastic tubing for the mast, cast off searchlights from BF's Israeli Centurians, some Stuka Zu Fuss rocket boxes and mounting pieces...built them all up and...
voila...pseudo SA-13...can't wait to see how it paints up.


Tuesday 16 February 2016

Team Yankee: Soviet Starter box

Howdy folks,

I've been making my way into this Team Yankee craze...I've gotten a few games under my belt...I've got some ideas for what I want to collect...I've even picked up some Cold War gems to read for extra inspiration and possible scenario writing...and

I've finally finished the starter box!! Very happy to get this done.  The biggest difference with the new plastics for me is the extra time I need to assemble everything.  With the standard resin models there was always some degree of prep time...however, with all the great detail these models have, there must be some trade-off...and so, many layers of skin were given towards the assemblage of these models.

To be quite fair...bitching aside, between the X-Files and Lucifer the other night, I did manage to assemble a box of BMPs with little injury to my digits.

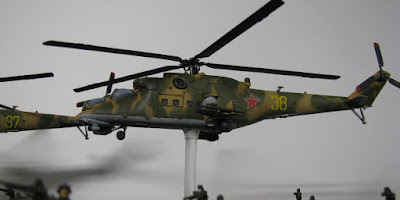
Anywho, I did struggle somewhat with the colour scheme for my T72's...after reading First Clash, I elected to go with a dark green scheme for my Sov Guards...the Hinds were primarily Russian Uniform with Desert Yellow ala some pics I'd seen of Mi-24's painted around early 1980's.

I am happy with the results...I like the variance...please enjoy...any advice is always welcome.
Cheers.

The starter box...9 x T72...er, actually 10...thank you product delay! I will gladly exchange 2 weeks of patience for a free T72! Tanks plus 2 x Mi-24 Hind
 
The boss...Formation Commander for Guards Tank Battalion
 
So far, 10 T72's of doom...I plan to add a few more to the fray in the future, but so far have them organized to 1 x Formation commander, 1st company: 5 x T72; 2nd company: 4 x T72


and a Gunship Assault Company with 2 x Mi-24 Hinds...at the moment I envision adding 2 more...maybe 4 along with some soldat's for an Air Landing Company

30,000 Views and climbing...THANK YOU ALL!!!

Howdy folks,

At some point over the last two posts, this little blog of ours has managed to climb above the 30,000 views milestone...for all your looks, views, advice, and comments...thank you!

Thank you very much for the time and attention and sharing in whatever hobby theme has my temporary focus.  I appreciate your time as it does help me better prioritize and focus my hobby time.

To celebrate, I have foregone the usual celebratory number in balloons...instead, I thought a new background pic of some of the years minis and games...


Thank you again....here's to 40K down the road.

Cheers.

Monday 1 February 2016

Batt Rep - Team Yankee...maybe a little more like Red Army...

So I had the chance to give Team Yankee a try with Mike last week...I must say I had a great time with the rules (thanks to Mike for doing the heavy rule thinking) and the game flowed very well and the changes sure felt like they forced a fairly mobile battle.  Because the rules seemed to make for a fairly slick and mobile battle, we were able to get 2 games in that night.

Mike beat me to the punch and put up his version here.  Now, as the comrade on that table please allow me to use this battle report to tell the real truth, not that Americansky bullshevik!!

 
Game 1
 
So I was actually rolling pretty hot that night...we elected to play the 'free for all' mission and that meant that both our formations were moving (no gone to ground, all considered to be at the move, reserves).  With the new rules, there really isn't much difference in rate of fire for on the move or at the halt...there are some stabilizer nuances in place for different weapons systems.
 
So I rolled well and got my choice of table edge...I elected to come in on the more 'tree-ey' side of the table, leaving the fields and a couple of buildings for Mike...I did not want the copse on my right flank to benefit his deployment.
 
Soviet and US deployment.  Hinds on right flank, small T72 company in the mids, larger T72 company on the left flank with Formation commander.  Mike had a platoon behind the buildings, commander in the grape fields, and second platoon in the wheat fields facing my Hinds.

Soviet deployment

Better view of US imperialists...

First turn, helicopters can pretty much move wherever they want with unlimited movement.  My Hind flight immediately took station at the back of german village in clear view of US platoon on the objective.  They dodged AA, fired ATGM, scratch 1 x M1...side armor is half of the front armor value.

Another picture, just because it looks impressive...big bad Hind taking care of business...

This platoon was 2 x M1...taking casualties they were at half strength...forced to take morale test...failed, first US platoon left the field...105s between their legs.  Second platoon moves from the wheat field to open range to engage my smaller T72 company as they moved towards the left flank.

M1 vs. T72...shots exchanged, burning M1 in the open field, bailed out crew in the second and the third M1 is good to go.

My larger company continues push to german ville...

More contact between the M1 platoon and the Hind flight...Mi-24 down...but, if I recall correctly the second platoon was taken out by combined ATGM and 125mm gunfire.

Bannon bravely rushes the objective to contest and shootout and Deutsche corral...it did not go well for him...he is felled by multiple hits from T72 company.  Game 1 to the Motherland...

Game 2

This time Mike elected to trade 1 x M1 for a flight of Cobra gunships...they took station behind centre of german ville.  I elected to push my Hind's to left flank with rest of troops pretty much same deploy as game 1.  My smaller company deployed further on the right to take advantage of the forest cover.

IIRC I went first again...hot dice...I pushed my Hinds to Mike's left flank (the larger platoon), I pushed my small company towards the field with tactical move so they could still fire.  I pushed my larger company one tactical move towards the ville and the copse of trees between the ville and the hill. 
 

Mike is getting some 105 rounds on target this time and I have 3 burning T72's on the left flank...my Hinds have taken another M1 and I have a burning T72 on the right flank.

The Hinds reposition at right middle edge of the table and take some sideswipes at the M1's...missiles on target, M1's down...I like this picture cause you can see the smoke plumes in the distance from the engagement on the left flank.
overview of the furball... 
Definitely the stars of the show...the Hinds watch across the plain at their handy work...my larger company with half losses elected to stay in the field and continued to hammer the M1's...this worked as it caused Mike to take a couple of morale checks...which he did fail...game 2 to the brave children of the workers paradise.