Showing posts with label Ambush Alley Games. Show all posts

Tuesday, 28 May 2024

Cangames - Battle Report - Force on Force

Howdy folks,

I hope all is well on your respective flanks. The past long weekend, 18-19 May, we had the annual gaming convention Cangames in town. Always a great time to connect with gaming friends, not to mention meeting new ones, I had another enjoyable con…perhaps a little more subdued than in the past, but fun was had. One of the things I look forward to is seeing the various historical listings, particularly if there any Force on Force games on the roster. Pretty much a staple for a few of us, FoF has its following, I happily count myself amongst them.

Thankfully, this year was no different, and Chris was running another foray into “Somewhere-istan”, next to Here-istan, There-istan, and Everywhere-a-stan-stan. Given that there was a bit of an admin err, we ended up with 1 more player than Chris had planned for. Most of the crew were new to FoF, so with the extra player, it let me sit back and enjoy the game and help out on the rules and flow for the new players.

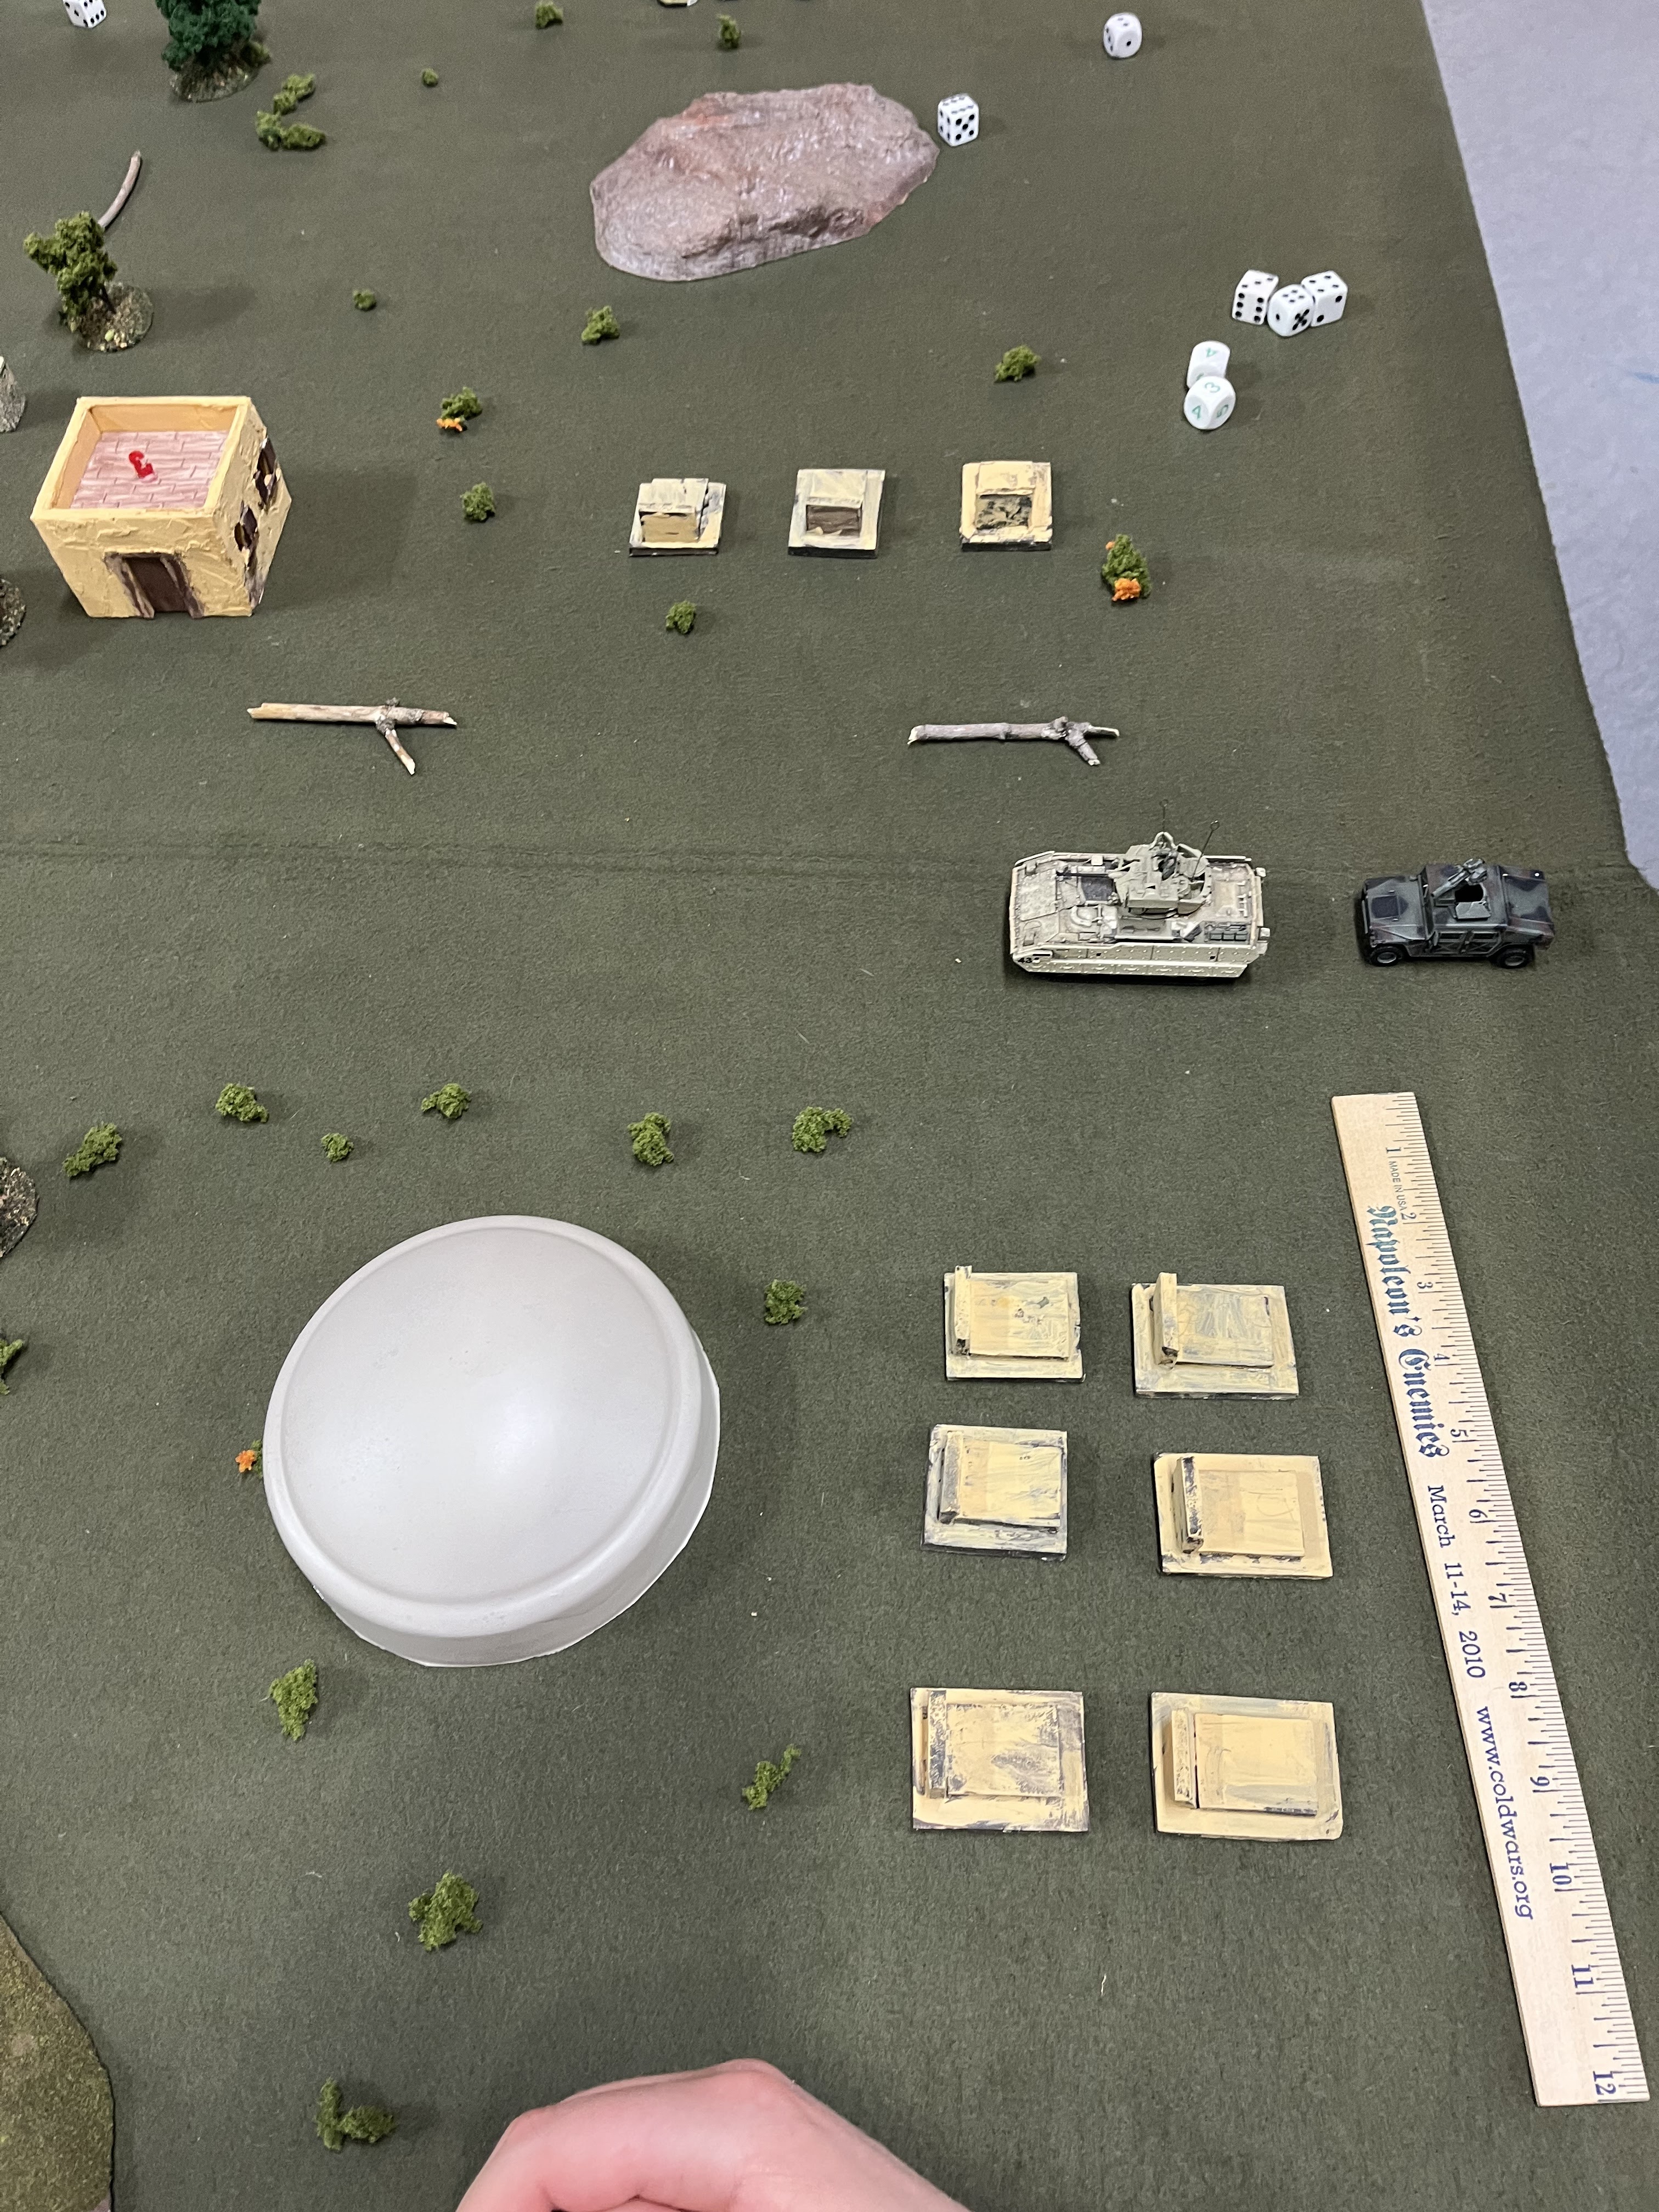
The setup was 2 x insurgent players, 2 x US players + me helping them out…which I didn’t mind, I was feeling a little slow so less stress/expectation was good for the mood. The US team had a Headquarters element that was established in a team house in the ville. There were 4 x fireteams w/ Humvees at the edge of the town. There were 6 hotspots set up, 2 were on the US end, and the remainder were on the opposite side of the table. While the fireteams were setting up, there is an explosion at the team house and all that could be seen was a lot of smoke. The immediate objective is to secure the team house and take stock of casualties from there. A landing zone has been designated on the left side of the table between the hill and grey building - opposite the team house.

This is about 1-2 turns into the game. The US players are advancing from bottom of the pic into the buildings to consolidate and remove the Hotspots. A round of fire has already removed insurgents near Hotspot 2, and another fireteam is moving towards the team house (tall building on the right side between the hills). Another grouping of insurgents is between them and the initial objective.

Close-up of the action. 2 x fireteams converge on the right building, a fireteam is in the open on the right side of the pic. These teams are engaged with the insurgents on the hill. A fireteam is in the left building, they will wait a turn to nullify the Hotspot.

While the teams are moving forward, 2 vehicles breakaway from the team house at high speed. One of the vehicles has a light machine gun in the back, and it looks like there might be uniformed personnel in the back, with the possibility that these are the HQ element that was at the house…so we cannot directly engage at this time.

The teams at Hotspot #1 have taken a few casualties, however you can see that the insurgents are having a rough go as well. The insurgent players had a rough time rolling for reinforcements; it let the US player to deliberately target and concentrate their firepower.

The US team successfully removed Hotspot #2, and the insurgent player popped up a team that was on the hillside in front of the team. Again, tough rolls on the reinforcement table helped to minimize the impacts. Although there were some dynamite rolls on both sides of the table.

US forces are deliberately moving up the table. Insurgents on both hills have been taken care of, allowing a team to reach the team house. They see signs of a fight - blood trails and dressings; while Hotspot #1 has been removed, one of the teams mounted their Humvee and is moving forward. The team on the left is advancing while also using their Humvee for cover and to provide supporting fire.

The house on the left hill is breached and taken care of. The fireteam at the team house has just had their Humvee disabled (mobility kill), so they will have to take the foot express from here on. The other fireteams that had started at Hotspot #1 are now on the move working to catch up with the insurgent vehicles. The fog of war adds have been harsh and kind…we lost all air support due to weather, but we gained a d10 quality sniper team who positioned on the roof of the grey building on the left.

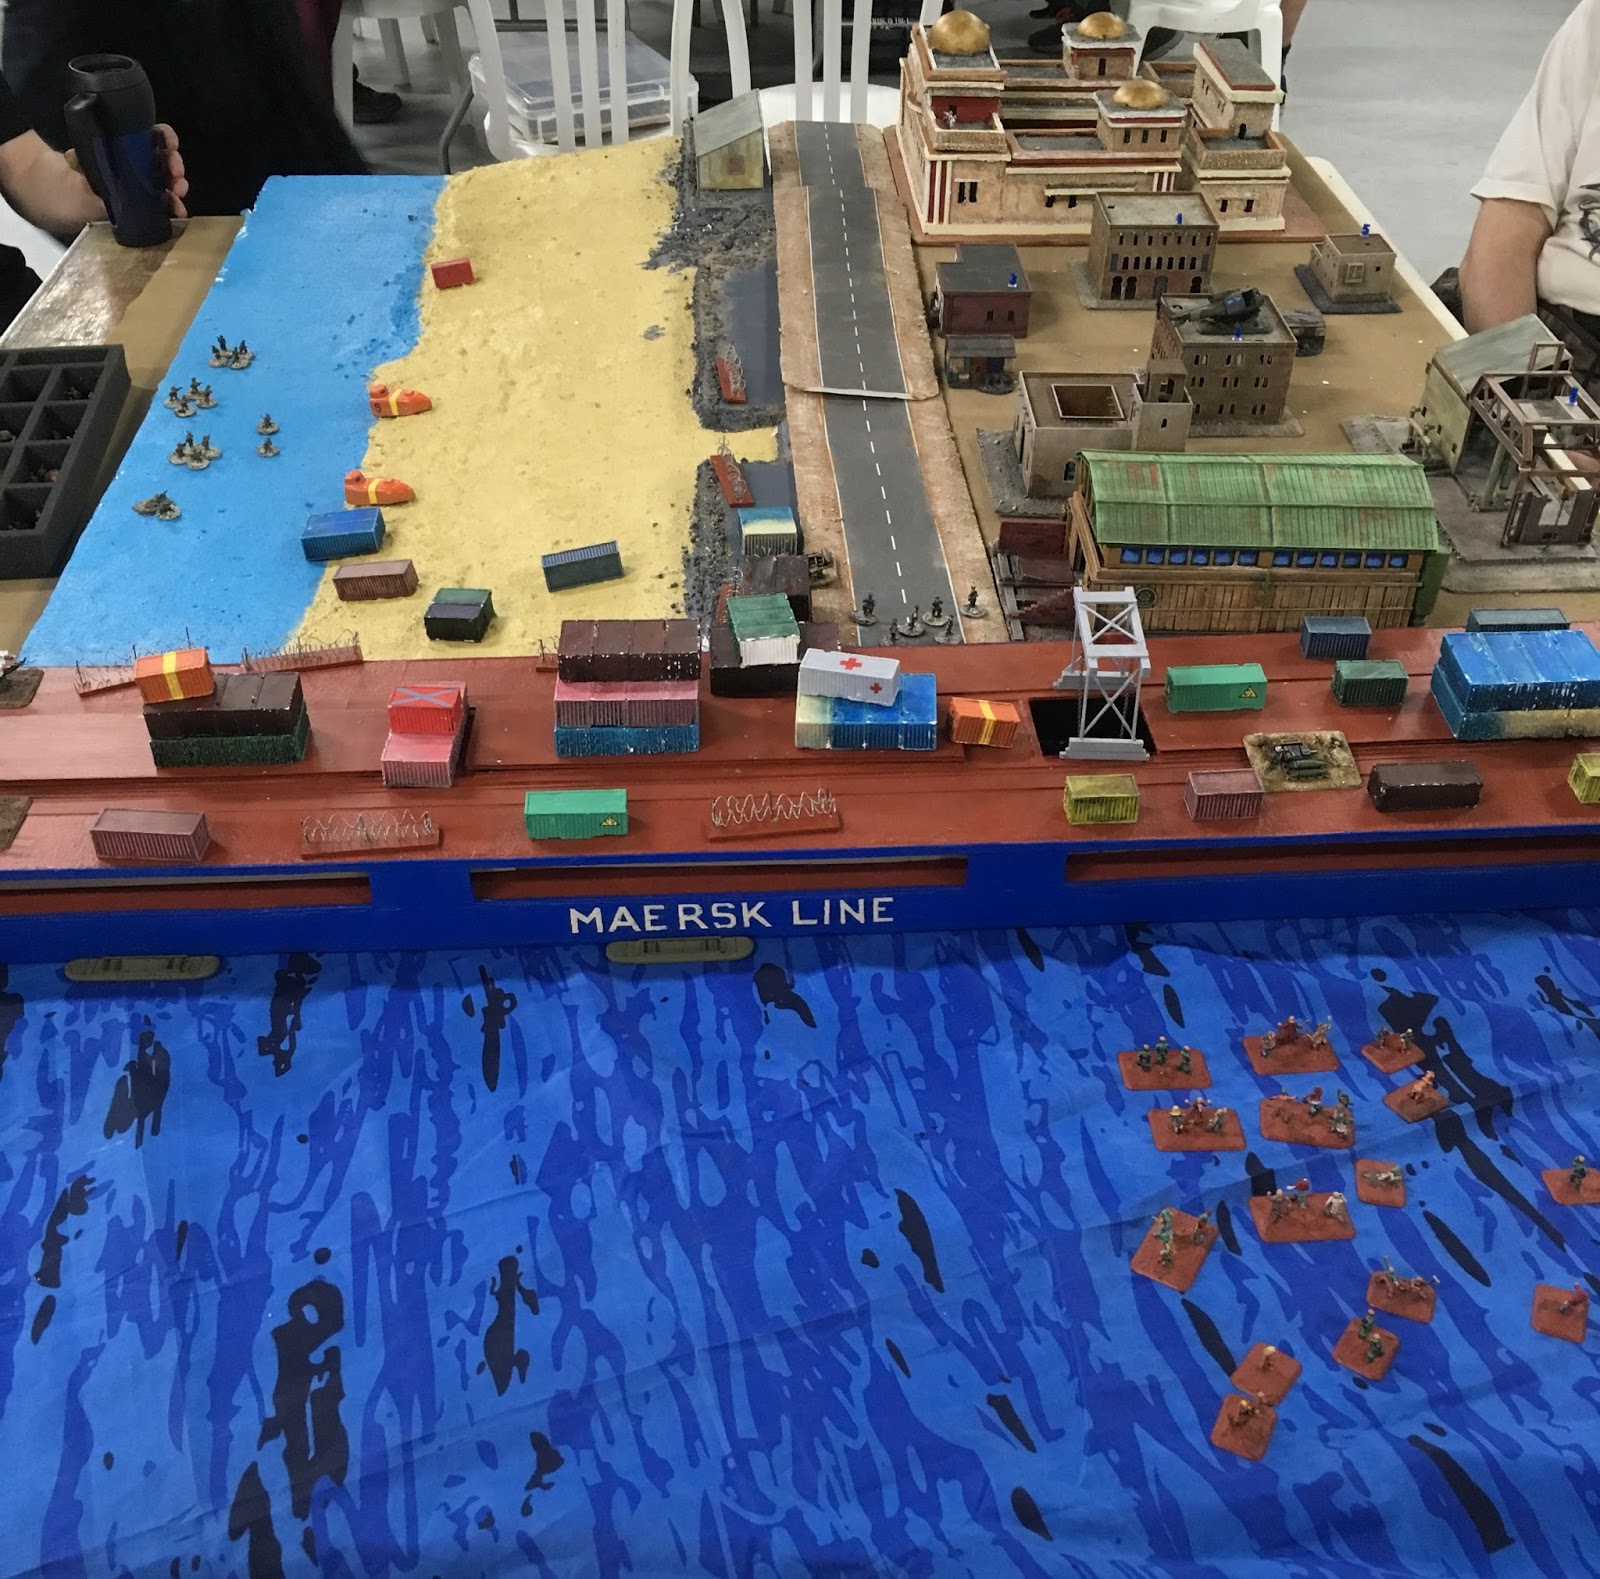
This is a few turns later, again insurgent reinforcement rolls have been rough, but they are starting to get troops on the table at the top of the picture. The US teams have continued to move up; there is a Humvee and fireteam at the grey building with the sniper team. They are laying own fire on the white  administration building (top left). The foot express fireteam is moving past another hill towards the HESCO barriers and laying down fire on insurgents in the red buildings to their front (top right). One of the fireteams presses on with their Humvee and find itself in a bottleneck between multiple groups.

A considerable amount of fire is layed down, some casualties are taken by the troops in the US humvee, while the green Humvee rushes in to clear out insurgents on the rooftop of the red building.

By this point, our time has almost expired…the US forces make some amazing initiative rolls, allowing them to keep pressure on the insurgents and get into a position where they mobility kill the 2 white insurgent vehicles, wipe out the last of the insurgent troops, and rescue their HQ element. 

Overall, a very enjoyable game…it may seem one-sided, but the insurgents did a great job of keeping the US troops on the edge. It never felt like a clear victory until the literal end.

Friday, 16 June 2023

Cangames - Force on Force - Battle Report (a long one!)

Hey Everyone,

For the last day of Cangames, I had the chance to get in a much anticipated game of Force on Force (FoF) run by my buddy Chris. Having played a few games of FoF against and with Chris before, I was looking forward to the game.

Overall objectives were pretty simple, US forces were to secure a high value target (HVT) in a local village, while Local forces were to disrupt, inhibit, and potentially defend the HVT from capture. Elected to take on the role of the US commander, Chris gave me a quick brief on the phases of the operation, #1. Ingress into the ville and take station around the main village building/mosque, #2. Secure the HVT and load them into the vehicles for extraction, and #3. Exfil and egress from the ville. Limiting factors for the US, while egress could be along main road leading South, ingress had to ignore this route as it would give too much warning to Local forces, and there were some tight timing constraints as each objective should be completed within 3 turns each.

Initial US forces were 4 humvees with a fireteam of 4 pers each (2 x M16/4, 1 x M16 w/203, and 1 x SAW…I think), each trooper had body armour, and were considered well supplied if within line of sight of  their vehicle with no obstructions in the way. There were no Local forces on the table, but there were several groupings of locals around the ville.

The ville…looking south, main building/mosque in the centre marked with HESCO barriers. There were 2 roads from the north on either side of the admin building, and 2 on either side from the east and west, you can see the main road leading south straight down the centre of the table.

You can see the initial ingress by the fireteams…one humvee per side coming in from top and bottom of the pic. 2 more teams coming in from behind the admin block on picture left. Again, the master plan was to ‘drive casual’ into town so as not to draw too much attention. So, a tactical move later, you can see a roadblock being placed near the lower humvee.

A better perspective from the south, you can see all 4 humvees in the town, roadblock in place on the left, and groupings of civilians blocking the way of the vehicles. The team near the roadblock takes the initiative and starts to discharge weapons into the air to disperse the crowd - to some effect. 

At this point, I push the other teams to expedite to the building and converge on three sides (north, east, and west). The east team drives his humvee into the HESCO barrier and drops a smoke grenade to distract locals and then dismounts.

As US troops dismount, robes are thrown aside, scraps of roadside debris are moved and weapons are taken up by the locals. As well, we start to see Local forces look down at the street from various rooftops. It is at this point that US forces have achieved objective #1 - I think it took us 3-4 turns to get here, At this milestone, Chris then tells me that my east and west fireteams were were under game control of insurgent/local players (so while they were in fact US troops, the game players intentionally made poor decisions to impede my master plan)…nice twist and explains the dumb-assery, lol.

Looking westward, you can see the roadblock, the smoke plume from the other team, and humvees on either side of the mosque. The HVT, a high ranking financier is hiding on the second floor. The road-blocked humvee stays in place, and the fireteam deploys to the nearby building with the intent of taking over the ‘hotspot’ to remove it from play (FoF hotspots are areas that insurgents can deploy to if they role that number, between 1 and 5, if they role a 6 they can choose - if the hotspots are still active).

I can’t remember if I rolled these defensively or offensively, but either way it gave me considerable impact on the team I was engaged with. Having to reach 4’s or better, the US forces used D8’s and Locals used D6’s to reflect training and quality of troops. So in this case, 1 miss and 4 unbeatable hits!

US troops are engaged on all sides of the mosque…some teams are taking hits but I think wounds were relatively minor at the time.

My team prepares to enter into the mosque and begin the search for the HVT…

Some more insane die rolls…fairly respectable on the US side, and insanely hot on the Locals side…only 2 of my shots make it through to the insurgent team that has sprung from the lower parts of the building that my roadblock team is on. The fireteam there is able to knock hotspot #3 out of commission and spend subsequent turns trimming down the insurgents near them.

The US forces are heavily engaged on 3 sides of the mosque. The HQ team breached into the building and were met with armed insurgents on the bottom and top floor. A well rolled initiative die gave the US the chance to move first and reduce the troops returning fire against them. The team was able to secure the HVT and started to move to their humvee…thus we reached milestone #2.

Given the challenges that the US forces were having with the ingress and securing the building - we had taken a few casualties and KIA - once the HVT was secured, a quick reaction force (QRF) was available to  provide some assistance. Inbound from the south, a Bradley and humvee TOW carrier bring up some heavier metal and firepower.

With the inbound QRF, the next few rounds were f’ing busy…the HQ team secured the package into the humvee and were promptly swarmed by insurgents. If these had all been civilians it would have been a far stickier situation…as it was, my fireteam lit up the grouping and then the fireteam that had been on the north wall re-entered their vehicle (taking their wounded and dead with them) and then went Chicago gangland on everyone and did a drive-by of the swarm as they made their way south. 

The western fireteam continued to trade shots with the insurgents near their position. Ultimately they were able to clear a path to their humvee and proceed to the southern road. 

At this point, the situation gets even more fluid. The Chicago crew continue southwards to egress from the table…I think they do fairly well overall (casualties aside). The HQ team continued to engage with insurgents who were trying to rescue the HVT - on a few occasions we had to make rolls to see if the HVT was accidentally hit by friendly fire…spoiler, he made it through unscathed, and DAMN we had some hot dice (4 rolls, all 8’s!!)…
At the same time, the Bradley and TOW carrier were heavily engaged with the carrier taking a significant hit (mobility kill if I remember correctly). All fireteams make for the south moving as quick as possible, the HQ humvee with the package ended up taking engine damage and could only do tactical moves (reduced movement, half).

The insurgents had a few moments of glory as well…they had done an excellent job of keeping the US forces occupied and had inflicted some fairly heavy casualties - all fireteams except the HQ had either dead and/or wounded. As well, they did pick up a technical from a Frog of War card…

Which was promptly lit up by the west-side fireteam and knocked out…much to their chagrin, lol.

However, the biggest break, which I didn’t fully know about until after the game, came from another Fog of War card. This made the last turn extremely critical…with the humvees reaching the south edge of the table, my final plan was to fully egress, have the Bradley pull up to the TOW carrier to extract the crew and then egress behind the humvees. The rub was, I would have to roll to win initiative so that I could act first.

I was able to make the roll and get the HVT and remaining vehicles off the table. If the insurgents had been able to take the initiative, thanks to the Fog of War card, they would have had a very powerful anti-tank roll at their disposal which they would have used to target the humvee with the HVT. In this case, it was a US victory but was fairly costly in resources and troops.

BUT a very enjoyable game!!

Monday, 29 May 2017

Cangames 2017 - Force on Force on Ambush Z

Hello everyone,

Another Cangames installment...this time, Force on Force with a little bit of Ambush Z thrown in to liven up the gaming table.  For me, playing FoF at Cangames on Sunday afternoon has definitely become a tradition.  It generally means the same regular cast of folks, gaming over a modern scenario, blowing off steam, chucking feces (figuratively of course), and having a good time.

The flipside to this...we do attract a crew of onlookers and collect other folks along the way who want to give moderns and FoF a try...so while it may 'crowd' in on the 'normal' group, it is also a great chance to promote the ruleset (definitely one of my favourites).

So, as of last Cangames, we had the SS Grozny drifting after the crew abandoned the vessel, after the Special Ops exfilled the vessel following their rescue, after the pirates abandoned the vessel, AFTER the discovery of non-aligned zombies...

Little Birds extract Tier 1 operators, the Pirates depart on their mother ship, the Grozny lists away...crewless, infested with Zombies....
 
This year, it has surfaced that the SS Grozny, still loaded with sea containers carrying special cargo and advanced military weapons and...nothing else (those were only rumours about Zombies...and everyone knows, Zombies only exist on TV)...has mysteriously shown up at the Mombasa dockyards.
 
The quiet beachtown was not expecting its arrival...let alone the washing up of sea containers and rescue craft from the Grozny...the Kenyan police carefully approach the vessel (you can see them on the left) and begin their inspection of the ship
 
Hearing of the arrival of the Grozny, the one that got away...from lesser Pirates, that is...a local insurgent group is organizing to take the vessel and its cargo for themselves.  Seeing the rescue craft on the beach, they also hear rumours that there are western scientists hiding in the ville.
 
US Special Operations Force troops infiltrate into the village...approaching the main building they receive intel that the scientists are being held on the second level by a local gang... 
 
Another team of Tier 1'ers infil from the sea, storming the beach seeking cover behind a small warehouse by the road...they line up and prepare to run across the breach in the seawall staying low to get to the Grozny as quick as possible...insurgents in the red garage (hotspot 3) try to take potshots at them without luck...
 
The police make it up to the ships deck...they heard reports of suspicious containers and begin a contraband search to secure the containers...suddenly Zombies appear and rush the policeman...the policeman scramble to the top of the containers to try to get to safety.  They successfully take out about half of the Zombies before they fall to their relentless melee attacks. 
 
At the same time, SOF push the breach at the seawall and push to a container on the shoreline...the team on the shoreline falls under intense fire...the seawall team are mostly unscathed.  By this time, the initial team has been supplemented by another sniper team and has rescued the scientists...they are methodically putting sniper and overwatch fire onto the closest hotspots whittling down the insurgents. 
Throughout the game, the insurgents draw numerous Fog of War cards after failing TQ tests...this results in US reinforcements, Zombies being upshifted to D10's, low supplies, and swiss cheese walls...not to mention, their rolls on the escalation table (to receive more reinforcements) are consistently failing...
 
The US team is very cautious, and it is working very well for them...they are making very good die rolls and are making objective points as they go along...for new comers to the game they are catching onto the mechanics very well... 
 
The end result, an American and Kenyan victory...multiple containers were secured, the scientists were rescued and secured, and there were minimal casualties from Zeke.
 
The Insurgents...many TQ tests were failed, many FOG cards drawn...many many many casualties from the SOF and from Zeke.  Not my best game...but probably not my worst, lol.
 
Take care.


Thursday, 9 June 2016

Cangames Report - Force on Force

Hello Everyone,

I have said in the past that one of my favourite modern warfare rulesets has to be Force on Force from the great folk at Ambush Alley Games...nope, I do not receive any promotional royalties, etc...I just like it that much.  There are a couple of key things about this ruleset...it allows movement and reaction, the mechanics are fairly quick to handle, the rules can be as tight or as loose as you need...no micrometers needed here, and I definitely settled into comfortably gaming the modern era thanks in large part to this ruleset and the community behind it...

Now for Cangames and the Grozny...Mike, Duncan, Ed, and myself wanted to try a Captain Phillips type scenario with Tier 1's and Pirates...in my mind I envisioned Tier 1's or Coalition troops hitting the beach neutralizing Pirate infested fishing villes on the Somali coastline...

In Ed's mind, this meant making a 1/100 scale version of a container ship...get some pirates...get some Tier 1's...make a Pirate mothership, seriously...he scratchbuilt a mothership...


...and game some Phillips.  The name of the ship actually comes from our shared 'horrendous' experience/performance in the Grozny scenario from the FoF main rulebook...Ed and I were the Russians and we were most brutally spanked by hordes of RPG totting Chechens...hence, the SS Grozny was born.

With that in mind, I thought I would end my Cangames reporting with the last game of the convention that I played...Force on Force with a Captain Phillips inspired scenario.  Welcome to the SS Maersk Grozny...onto the game.

THE GAME

The Grozny is loaded deck heavy with a variety of containers and cargo...the ship steams a little to close to the Somali coast attracting the attention of fortune hunting Pirates.  Onboard the Grozny, we have the ships Captain, Engineer, 3-4 stands of crew (armed with clubs, pry-bars, etc), 2 stands of hired goons/mercenaries, and a Merc Captain.

The main issue with the Grozny is that...well...some of it's cargo is not quite on the up 'n up...it is carrying a missile launcher on the maindeck...a couple of specially marked containers...and has a couple of passengers in labcoats who speak with a thick authoritative accent...in the ships safe is approx. $200K and Pirates have been spotted...here in lies the scenario.

- The SS Grozny...you can see the missile launcher on top of the superstructure...it actually belongs with the containers on the maindeck -

A nice fat return pops on the Pirates radar...this can only mean one thing...a big, fat, sssslllooowwww, wealthy American ship is within range...4 would be Pirate kings...or princes jump in their fishing boats with their crew to intercept the target...

On the maindeck, a stand of Mercs keeps a watchful eye out for trouble...
The Mercs and various non-lethal measures are all that protects the ship and crew...clearly marked for your safety...the ship is equipped with a sonic array and water cannon.  Ed really did his research here and explained in some detail the countermeasures that realtime crews and ships are deploying in their fight against Pirates.

With Pirates spotted near the large beer cup, the Mercs get in position on the main deck to protect the cargo taking position near the humanitarian aid container and the missile launcher...gotta love irony...

The Pirates make their run in to the ship...the ships Captain and the Merc leader control the sonic wave mast and try to impede the attackers...one of the boats is pinned for the turn...

Which unfortunately doesn't last very long...sonic waves and water cannons have not done much to the Pirates and they space themselves out in prep for boarding.

The Merc Captain deploys some of the ships other defensive measures...6 stands of concertina wire spring up near the immediate threats forcing fishing boats to steer for the open spots at the starboard side and port (left) aft (back) side (side).


Pirates reach the side, roll to see if the ocean waves cause any men overboard...all told, IIRC 3-4 Pirates loose their footing and fall into the ocean...a couple of teams make it to the belowdecks and main deck...

...and quickly knock out the water cannon for a turn or 2...coincidentally, all of the figures come from 3 different collections and are all from the various Khurasan Miniatures lines...above are Somali Pirates on the left, and future war insurgents on the right...

Mike's Pirates elected to keep moving to the port side once the concertina wire popped up...his guys made a successful board, lost only 1 Pirate if I remember...made it to the aft bulkhead, spun the opening lever...and the Merc Captain sprung another non-lethal trap...this time, again a realworld countermeasure...a 50 gallon drum filled with liquid coloured goo that impedes movement and makes it hard to stay standing on the deck...in this case, the Pirate had to roll a D6 to see how many turns the stand was immobilized for...Mike rolled a 1...bugger.

Another Pirate crew make it to the water cannon, take some hits from the Merc stands...and successfully immobilize the cannon...it is now inop...

Mike's Pirates continue around the superstructure, find the ladders and start making their way to the bridge...at this time, the Captain makes the very brave move of running like a screaming baby from the bridge...you know, to distract the Pirates...

...and yells, "YOU'RE THE CAPTAIN NOW!!!" to every Pirate he sees...he jumps in the port side life boat...and f@#ks off...Yup...no kidding...the Captain bravely abdicated command...

The Pirate crew near the water cannon continue to push towards the Mercs near the cargo containers...pushing for the missile launcher...this will get big bucks and prestige from the Pirate who aspires to be King...

Another Pirate crew push from the front of the ship...

While this Pirate crew reach the launcher and the containers...Mike's Pirates successfully take the bridge...the Engineer successfully made it below decks to a secured panic room where he could still remotely operate ships secondary systems.

The call goes out to Coalition command ops..."The Grozny has fallen...Grozny has fallen"...on QRF standby, Coalition forces commit special ops troops to the Grozny.  To the bombastic sound of 'Cry of the Valkyrie', the Little Birds come in with Tier 1's...

Concurrently, once the bridge had fallen, the ships crew had a chance to hide out of sight...the Pirate commanders also had the chance to switch sides from Pirate to Tier 1'ers...we had an even split...2 Pirates stayed...2 crossed over and took command of a flight of Little Birds.  Coincidentally, while the Little Birds are from Battlefront's Vietnam range, the special ops dudes are all Khurasan Miniatures.

Each Spec Op commander had 2 x Little Birds for insertion; 7 x Tier 1 Operators and 1 sniper that could remain onboard a helo...the Pirates were D6 for Troop Quality, D8 for Morale; Tier 1's were D10 TQ/D10M...they came to play...

Tier 1's elect to put 2 birds forward and 2 aft...1 bird aft fast ropes 4 operators down to push to the bridge...

Their other Little Bird provides some sniper top cover...

The Pirate Commanders received some reinforcement and were able to deploy above or below deck...being below deck provided some additional cover from overhead...

With the top of the structure removed, you can see some crew in orange jumpsuits on the bridge, the Pirates leave behind 1 x gunman to maintain control and push the remainder towards the Tier 1's...a couple rounds of shooting and close assault leave the Spec Ops with 1 wounded...the Pirates are wiped out.
I don't have the picture, but at the front of the ship at the same time, their were also a couple rounds of close assault that DID NOT go so well for the Tier 1's...the Pirates were doing a very good job of rolling 4+ on D6's, while the Tier 1's were NOT rolling 4+ on D10's...every operator except 1 was killed...the Pirates elected to capture the wounded operator when they recognized his face from CNN and realized he was a Senator's son...

In the meantime...the back and forth at the front of the ship, expenditure of copious amounts of ammunition results in a stray round hitting a couple of the sea containers...just as the sound of hammering on the walls of a green sea container emblazoned with bright bio-hazard markings can be heard...the Engineer kills the lights from the panic room and plunges the ship into darkness...

Which allows hordes of ZOMBIES to spill from the damaged containers...allowing them to quickly move to the closest stands and engage in close assault...turns out that on the poorly filled out manifest...Mr Smith and Mr Cruise were actual Herr Doktor Schmidt unte Doktor Krause...they were taking a long covert trip to the United States along with a few containers of their 'research courtesy of Operation Paperclip...

We are now in an Ambush Z environment...the objective is to either:
RUN


or, like the Cap'n said "I wanna see some Zeke on the ground"


A stand of zombies make a food run towards the nearest Pirate stand...munch munch...


Coalition forces rush in an evac helo...Tier 1's at the back of the ship yell "get to the choppa" and evac from the ship...

At the front of the ship, the Pirates let their captive has his carbine back...shots ring out at the rushing zombies, another 4 stands spill out of container 9...IIRC, the Little Bird puts a few rounds into the Pirates trying to free their comrade, causes a couple of casualties...the Pirates fire at the zombies...Zeke is hitting the ground...


...the next round a couple of Zeke's reach the Pirate group and the Tier 1 survivor...I cannot remember if they survived or not...

...at this time, even the Pirate King is rushing in to evac his men with the mothership...
The last group of Pirates watches as their cohorts jump to the mothership...the Little Birds buzz around keeping their distance...the zombies rush their position smelling their fear...

The zombies easily jump up the containers reaching the survivors...
...and enjoy a light snack for their efforts easily overrunning the last Pirate stands...

At the rear of the SS Grozny...the choppa and Little Bird evac the Tier 1's...the ships crew beat feet towards the last life boat, successfully deploying before anyone gets nibbled

The last surviving Pirates make it off the ship...WTF just happened they all ask themselves...should've just grabbed the cash from the vault...