Howdy Folks,
Happy end July to everyone...the month has surprisingly gone by very quickly, and definitely seen some interesting weather come through the province. The last week has been especially interesting given how much changing air pressure messes with my injuries...and last nights weather really was quite something to watch. Luckily all safe here, most of the really 'interesting' stuff developed south and east of us, and I hope all is safe where you are interneting.
For this post, I thought I would give a psuedo painting update and quick tutorial or guide on how I paint up my bases. The idea came for this came from a Reddit post I saw where someone was looking for some advice on getting more texture and colour out of their base painting. I've done this before in the past with some Cold War Infantry from Battlefront, as you will see at the link and below, I definitely have a system and standard-ish scheme that I like to use.
Hope this is of us...have a good one.
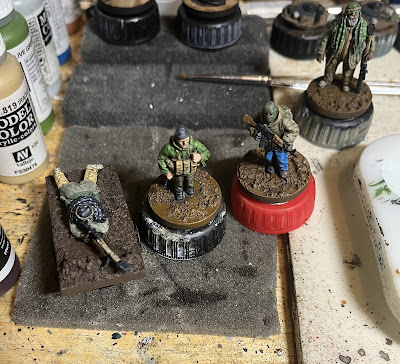
All figures are from Empress Miniatures and unless stated I'm using Vallejo, from left to right I have 3 different colours. Base colour is Burnt Umber, then dryish brush of Flat Earth, and then a dryer brush of Beige Brown.
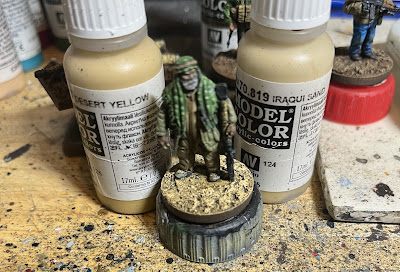
I then had the idea of just putting the paint bottle behind the figure so you could see the name of the paint and the progress of the layers. So as above, left to right, with the inclusion of a standing sniper at the bottom of the pic. In this case, the base layer is still Burnt Umber and then dryish of Desert Yellow.
So you can see the next layer for each model, again left to right with Flat Earth for prone sniper, Beige Brown for green jacket, and Tan Earth for green toque.
Progressing the figs...I'm now adding Iraqi Sand for green toque, a fairly dry brush of that, I don't want it to overpower, just to lighten a little.
For my standing sniper, I thought I'd catch up...Desert Yellow was layer two, and then a dry brush of Iraqi Sand to make stuff pop...my next step will be to flock and overcoat...you'll see the finished figure on a follow-up post.
Just catching the other figures up...you can see Tan Earth for the prone dude, and Iraqi Sand now for green jacket.
For prone dude, I added some Army Painter Strong Tone to the base and I'm just hitting creases and areas that I want shadowed tone. Helps to break up the terrain from the figure and give some depths, especially to the improvised wall he has built up in front of him.
Overhead shot...just trying to capture the various tones and shades...
And in case anyone is curious on what I used for these bases, I do often use Citadel technical paints...I really do like the, they're pretty handy and makes some of the basework easier...especially when I am feeling lazy and don't want to break out my filler or sand.
Again, hope this is of help...Cheers!


